
Sprains are the most common injury on the trail, and a twisted ankle can ruin a weekend in the woods. The good news? You can dramatically lower the odds of getting sidelined by following a few smart habits. Below you’ll find a step‑by‑step guide that covers everything from anatomy to gear, so you can keep moving forward.
What Exactly Is an Ankle Sprain?
Ankle Sprain is a ligament injury around the ankle joint caused by a sudden inversion or eversion movement, typically graded I‑III based on severity. GradeI involves microscopic tears, GradeII a partial rupture, and GradeIII a complete tear that may require surgery. Understanding the injury’s mechanics helps you choose the right prevention strategy.
Why Hikers Get Sprained
Several trail‑specific factors stack up to increase risk:
- Uneven terrain: rocks, roots, and loose gravel create unexpected foot placement.
- Backpack load: Excess weight shifts your center of gravity, stressing the ankle.
- Fatigue: As muscles tire, proprioception drops, making slips more likely.
- Improper footwear: Shoes without adequate support or poor fit can’t lock the foot in place.
By tackling each factor, you can cut the odds of a sprain dramatically.
Warm‑Up and Dynamic Stretching
Dynamic Warm‑up is a series of movement‑based exercises that raise body temperature and activate the muscles used for hiking. A good warm‑up takes 5‑10 minutes and focuses on ankle mobility, calf activation, and balance.
- Heel‑to‑toe walks (2minutes): Walk forward placing the heel down first, then the toe, to stretch calves and improve ankle range.
- Leg swings (30seconds each side): Swing the leg forward‑back and side‑to‑side to warm hip and ankle joints.
- Standing calf raises (2sets of 15): Raise onto the balls of your feet, pause, and lower slowly.
- Ankle circles (10 each direction): Lift one foot and rotate the ankle fully, promoting joint lubrication.
Finish with a few balance drills to fire up proprioception.
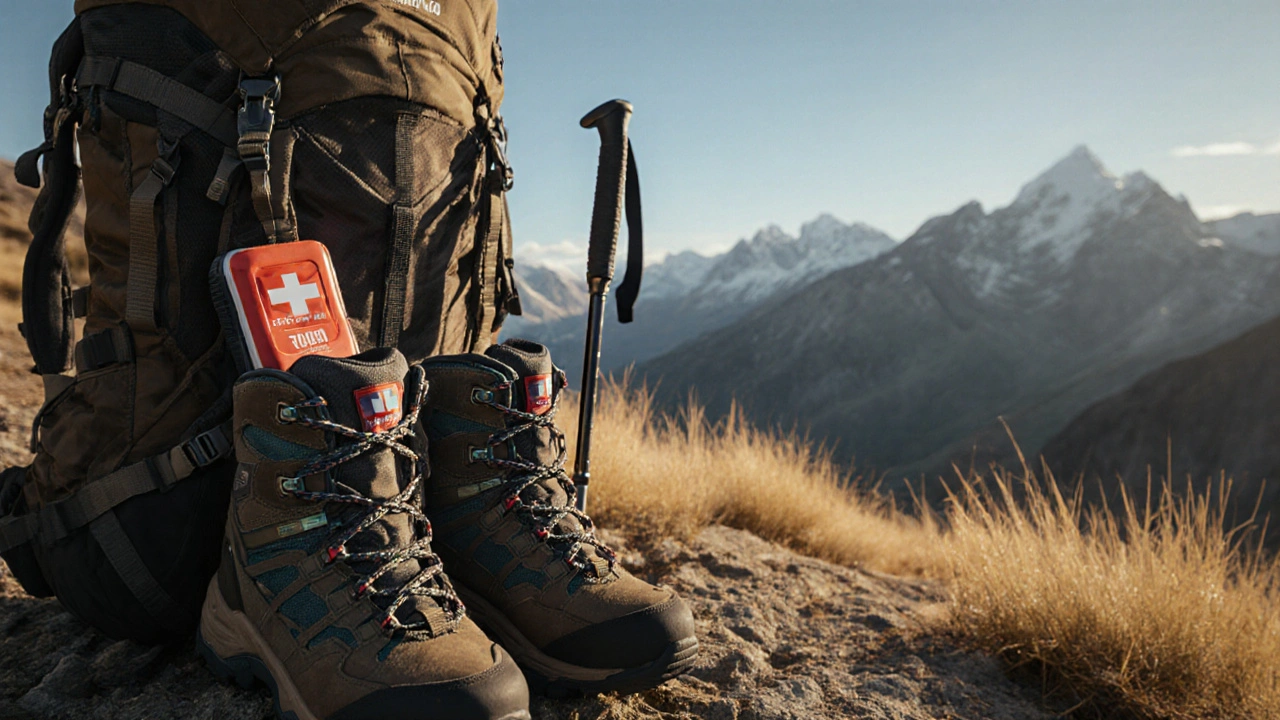
Gear That Makes a Difference
Choosing the right equipment is half the battle.
Hiking Boot is a sturdy, mid‑to‑high‑cut shoe designed for uneven terrain, offering ankle support, waterproof membranes, and aggressive tread patterns. Look for boots with a 15‑20mm heel drop, a stiff midsole, and a supportive inner liner.
Trekking Pole is a lightweight pole, usually aluminum or carbon fiber, that provides upper‑body stability and reduces ankle load. Using poles on steep ascents or descents can cut ankle torque by up to 30%.
Backpack Load Distribution is a system that spreads weight evenly across the hips and shoulders, minimizing ankle strain. A well‑fitted pack places no more than 20‑25% of total weight on the shoulders; the rest rests on the hip belt.
Compression Sleeve is a tight, breathable garment that encircles the ankle, providing mild support and improved blood flow. Ideal for low‑grade sprain prevention and post‑hike recovery.
Ankle Brace is a rigid or semi‑rigid device that straps around the ankle, limiting harmful inversion movements. Best for hikers with a history of sprains or those tackling technical terrain.
Balance Exercise is a training routine that improves proprioception and joint stability, such as single‑leg stands on an unstable surface. Regular practice sharpens the reflexes that keep you upright on rocky paths.
Comparing Ankle Support Options
| Support Type | Weight (g) | Support Level | Cost (USD) | Ease of Use |
|---|---|---|---|---|
| Ankle Brace (rigid) | 350 | High | 45‑70 | Medium |
| Compression Sleeve | 120 | Low‑Medium | 15‑30 | Easy |
| Laced Hiking Boot | 900 | Medium‑High | 120‑200 | Medium |
| Gaiter + Lacing | 200 | Low | 20‑40 | Easy |
For most backpackers, a sturdy hiking boot paired with a lightweight compression sleeve offers a balanced mix of protection, comfort, and price. If you’ve suffered multiple GradeII sprains, add a semi‑rigid brace on especially technical sections.
Trail Techniques to Protect Your Ankles
How you place each foot matters more than you think.
- Look ahead: Scan two to three steps ahead to choose stable footholds.
- Shorten stride on descents: A shorter step reduces impact forces on the ankle.
- Use trekking poles on uneven ground: Plant the pole opposite the foot that feels unstable to off‑load the ankle.
- Maintain a slight knee bend: Keeps muscles engaged and absorbs shock.
Combine these habits with regular balance checks-lift one foot for a few seconds every 10minutes to reset proprioception.
First‑Aid Basics if a Sprain Occurs
Even with the best prep, accidents happen. Knowing the RICE protocol (Rest, Ice, Compression, Elevation) can limit swelling and speed healing.
- Rest: Stop moving the injured ankle for 24‑48hours.
- Ice: Apply a cold pack for 15‑20minutes every 2hours.
- Compression: Wrap the ankle with an elastic bandage at moderate pressure.
- Elevation: Keep the foot above heart level to reduce fluid build‑up.
If pain persists beyond three days or you can’t bear weight, seek medical evaluation-some GradeIII injuries need professional care.
Quick Checklist Before Hitting the Trail
- Perform a 5‑minute dynamic warm‑up.
- Inspect boots for cracks; lace them snugly but not too tight.
- Fit a compression sleeve or brace if you have a prior sprain.
- Load your pack so shoulder weight stays under 25% of the total.
- Carry a small first‑aid kit with an elastic bandage and ice pack substitute.
Review this list each morning; it takes less than a minute but can save days of downtime.
Related Topics to Explore
Preventing sprains fits into a broader safety ecosystem. Consider reading about trail navigation basics, nutrition for endurance, and post‑hike recovery routines. Each area reinforces the habits you build around ankle health.
Frequently Asked Questions
Can I hike without ankle braces if I’ve never sprained before?
Yes, many hikers never need a brace. Focus on proper footwear, a good warm‑up, and load management. If you start noticing frequent twists, add a lightweight compression sleeve first, then consider a brace.
How much weight should my backpack be for a day hike?
Aim for 20‑25% of your body weight. For a 70kg hiker, that’s roughly 14‑17kg. Distribute the bulk low on the hips and keep the pack’s center of gravity close to your back.
Are trekking poles worth the extra weight?
Absolutely. Poles reduce the load on each ankle by up to 30% on steep terrain and improve balance, especially on slippery or loose surfaces. The weight penalty is minimal-about 300g total.
What’s the best stretch for ankle flexibility?
The calf‑gastrocnemius stretch performed against a wall: place the ball of the foot against the wall, lean forward keeping the heel down, hold 20‑30seconds each side. Follow with a soleus stretch by bending the back knee slightly.
How soon can I return to hiking after a Grade I sprain?
Most people resume gentle hiking within 5‑7days, provided they’ve completed a brief rehab routine and the ankle feels pain‑free during weight‑bearing. Start with short, flat routes and reintegrate more challenging terrain gradually.
hiking sprain prevention isn’t a single trick-it’s a collection of smart choices, from the shoes you lace up to the way you step on a rocky ridge. Incorporate these habits, and you’ll spend more time reaching vistas and less time nursing bruised ankles.
Comments
Marianne Wilson
While the guide is useful, it constantly misuses "ankle sprain" as a catch‑all for any foot discomfort-precision matters.
It's also contradictory to preach "lightweight gear" yet recommend bulkier braces without discussing the trade‑offs.
We owe fellow hikers a higher standard of clarity and responsibility.
September 27, 2025 AT 01:08
Patricia Bokern
Can you believe the big outdoor brands are secretly pushing ankle braces just to sell more gear?
They hate us hikers who think we can survive on pure skill alone-so they flood the market with "must‑have" accessories!
October 1, 2025 AT 15:15
Garrett Gonzales
From a biomechanical standpoint, the key parameters are inversion torque, proprioceptive feedback latency, and cumulative load‑bearing cycles.
The literature defines the critical threshold for ankle inversion at approximately 30 Nm, beyond which ligamentous strain escalates rapidly.
Implementing a structured warm‑up that targets gastrocnemius‑soleus complex can reduce baseline torque by up to 12 %.
Choosing a boot with a longitudinal stiffness >150 N·m also attenuates peak forces during uneven terrain negotiation.
When integrated with trekking poles, the axial load redistribution further diminishes ankle shear stress by an estimated 25 %.
Therefore, a holistic approach-dynamic mobility, appropriate footwear, and load management-is empirically supported.
October 6, 2025 AT 05:22
Aman Deep
In the quiet of the forest the ankle learns humility and grace – a dance of earth and foot.
Embrace the rhythm, let each step echo softly.
October 10, 2025 AT 19:29
Herman Bambang Suherman
Start each hike with a brief ankle mobility drill; it primes the joint and reduces strain.
October 15, 2025 AT 09:36
Meredith Blazevich
I remember the first time I twisted my ankle on a loose scree slope and lay there, helpless, watching clouds drift overhead.
The pain was a raw reminder that my enthusiasm outpaced my preparation.
After that ordeal I swore to never ignore the warm‑up, no matter how rushed I felt.
Dynamic heel‑to‑toe walks have become a ritual for me, and they feel oddly soothing as the muscles wake.
I also invested in a mid‑cut boot with a reinforced toe cap, which steadies me on jagged basalt.
The compression sleeve I wear under the boot feels like a gentle hug, providing reassurance without choking circulation.
On weeks when fatigue sets in, I deliberately shorten my stride on descents, allowing my knees to absorb shock that would otherwise hit the ankle.
Using trekking poles on the south‑facing ridge has cut the load on my lower legs dramatically, and I’ve noticed fewer micro‑twists.
I keep a small first‑aid kit in my pack, because the RICE protocol is a lifesaver when the unexpected happens.
Ice packs aren’t always available, so I carry a thin gel pack that can be swapped for a cold stream of water.
If swelling appears, a light compression bandage can keep it from ballooning.
Elevating the foot on a rock during a break helps fluid drain and eases throbbing.
The biggest lesson, however, is to listen to your body’s signals-an early twinge is a warning, not a challenge.
Regular balance drills on a wobble board at home have sharpened my proprioception, making me feel steadier on slick moss.
In short, the combination of proper gear, mindful technique, and quick first‑aid can keep the trail open and your ankle healthy.
October 19, 2025 AT 23:43
Megan Lallier-Barron
Sure, a cheap sleeve “works” for some, but real hikers know it’s just a fashion statement 😊.
If you want actual support, consider a brace-if you dare to invest.
October 24, 2025 AT 13:50
Kaushik Kumar
Alright, folks, let’s break this down, step by step, because clarity is king, and you deserve a roadmap, not a maze!
First, warm‑up-that’s the foundation, the launchpad for safe trekking!
Second, choose boots that hug your feet like a good friend, and don’t skimp on the ankle cut!
Third, distribute pack weight evenly, because a lopsided load is a recipe for disaster!
Finally, keep that first‑aid kit handy, because accidents happen when you least expect them!
October 29, 2025 AT 02:57
Abhishek Vernekar
I appreciate the thorough guide, but there are a few grammatical slips you might want to fix: “excess weight shifts your centre of gravity”-in American English it’s “center,” and “the ankle torque” should be “ankle torque.”
Also, “It’s a good warm‑up” needs a comma after “up.”
Polishing these details will make the article as solid as the recommended boots.
November 2, 2025 AT 17:04
Val Vaden
Honestly, this reads like a checklist that a robot wrote 😂
November 7, 2025 AT 07:11
lalitha vadlamani
While the article extols the virtues of compression sleeves, it overlooks the fact that many hikers experience discomfort due to excessive compression, which can impair circulation and paradoxically increase injury risk.
Thus, a blanket recommendation is medically unsound and ethically questionable.
November 11, 2025 AT 21:18
kirk lapan
Im not sure why anyone would trust a guide that doesnt mention proper lacing techniques, that’s a big miss.
November 16, 2025 AT 11:25
Andy Jones
Oh great, another “just do this and you’ll never sprain” article-because we all know hikers never ignore basic physics.
But hey, if you love reading bullet points more than pulling your own weight, go ahead.
November 21, 2025 AT 01:32
Leonard Greenhall
The piece presents a decent overview, yet it fails to cite recent peer‑reviewed studies on ankle proprioception training, which limits its scientific credibility.
Incorporating that data would elevate the guide from anecdotal to evidence‑based.
November 25, 2025 AT 15:39
Priya Vadivel
Thank you for the comprehensive checklist!
Could you perhaps elaborate on how to assess boot stiffness without specialized equipment? Your insights would be greatly appreciated.
November 30, 2025 AT 05:47
Dharmraj Kevat
We march on the trail, yet they hide the truth in plain sight.
December 4, 2025 AT 19:54
Benjamin Herod
Reading this feels like wading through a brochure written by a corporate marketer-enthusiastic but lacking depth.
If you truly care about ankle health, provide deeper biomechanical analysis beyond the generic “use poles”.
December 9, 2025 AT 10:01
Sadie Bell
Let’s stay sharp, stay prepared, and keep those ankles happy-no excuses, just action.
December 14, 2025 AT 00:08